

Windows Defender là lớp bảo mật mặc định được tích hợp sẵn trên hệ điều hành Windows, trong đó Antimalware Service Executable đóng vai trò quét và ngăn chặn các mối đe dọa từ virus. Tuy nhiên, nếu tiến trình này hoạt động quá mức, nó có thể gây ảnh hưởng đến hiệu suất hệ thống. Bài viết sẽ hướng dẫn bạn cách tắt Antimalware Service Executable hoặc tối ưu hoạt động của tiến trình này một cách hiệu quả.
Antimalware Service Executable là gì?
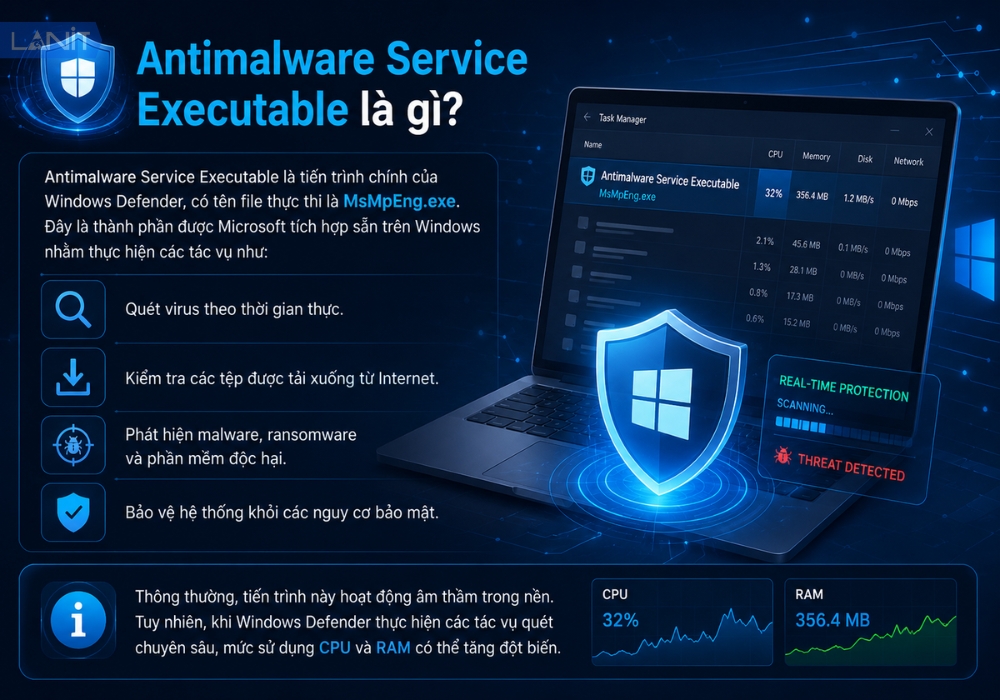
Antimalware Service Executable là tiến trình chính của Windows Defender, có tên file thực thi là MsMpEng.exe. Đây là thành phần được Microsoft tích hợp sẵn trên Windows nhằm thực hiện các tác vụ như:
- Quét virus theo thời gian thực.
- Kiểm tra các tệp được tải xuống từ Internet.
- Phát hiện malware, ransomware và phần mềm độc hại.
- Bảo vệ hệ thống khỏi các nguy cơ bảo mật.
Thông thường, tiến trình này hoạt động âm thầm trong nền. Tuy nhiên, khi Windows Defender thực hiện các tác vụ quét chuyên sâu, mức sử dụng CPU và RAM có thể tăng đột biến.
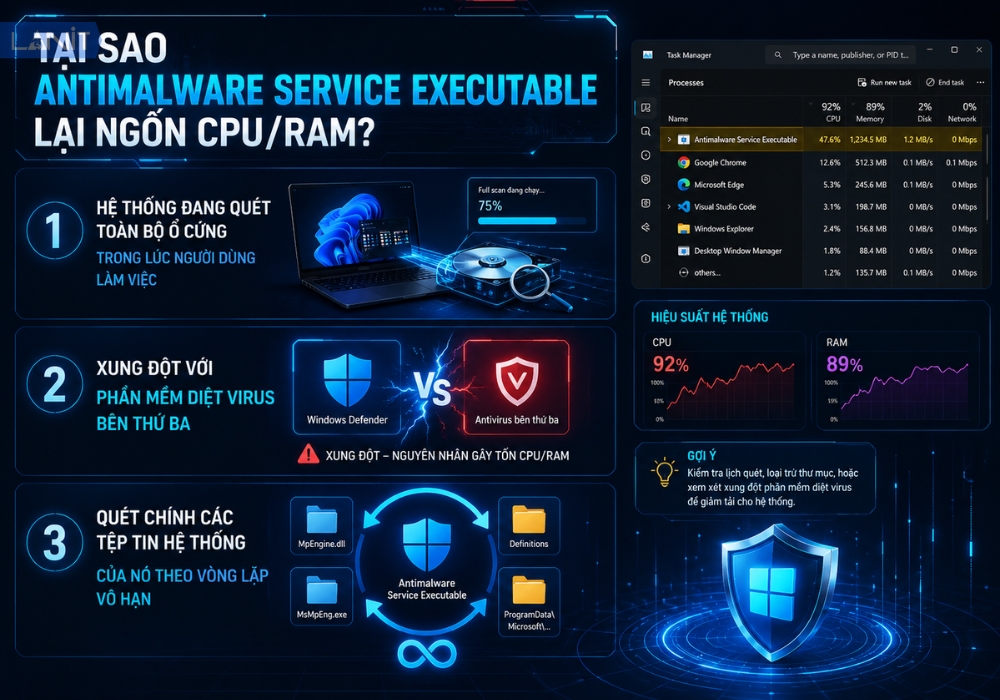
Tại sao Antimalware Service Executable lại ngốn CPU/RAM?
Trong điều kiện hoạt động bình thường, Antimalware Service Executable chỉ sử dụng một lượng nhỏ tài nguyên hệ thống. Tuy nhiên, ở một số thời điểm, tiến trình này có thể chiếm dụng CPU và RAM ở mức cao do các nguyên nhân sau:
- Hệ thống đang quét toàn bộ ổ cứng trong lúc người dùng làm việc: Windows Defender tự động thực hiện các tác vụ quét định kỳ nhằm phát hiện virus và phần mềm độc hại. Quá trình này có thể tiêu tốn nhiều CPU, RAM và ổ đĩa, đặc biệt khi máy tính đang chạy các ứng dụng nặng.
- Xung đột với phần mềm diệt virus bên thứ ba: Khi cài đặt đồng thời Windows Defender và các phần mềm bảo mật khác như Kaspersky, ESET hoặc Bitdefender, các chương trình có thể liên tục kiểm tra cùng một tệp tin hoặc tiến trình, dẫn đến tình trạng sử dụng tài nguyên bất thường.
- Quét chính các tệp tin hệ thống của nó theo vòng lặp vô hạn: Trong một số trường hợp, Windows Defender có thể tự quét chính tiến trình MsMpEng.exe và các thành phần liên quan. Điều này tạo ra vòng lặp quét liên tục khiến CPU luôn hoạt động ở mức cao dù người dùng không thực hiện tác vụ nào.
Hướng dẫn cách xử lý/tắt Antimalware Service Executable hiệu quả
Nếu tắt hoàn toàn Windows Defender mà không cài đặt bất kỳ phần mềm diệt virus nào khác, máy tính sẽ đứng trước nguy cơ rất lớn bị nhiễm Malware, Trojan, Ransomware hoặc các loại virus lây lan qua Internet. Trong thực tế, chỉ nên tắt hoàn toàn Antimalware Service Executable khi:
- Đã cài đặt phần mềm diệt virus khác như ESET hoặc Kaspersky.
- Máy tính chuyên dùng để chạy giả lập Android.
- Hệ thống phục vụ MMO hoặc Automation cần tối đa hiệu năng CPU.
- Máy chủ thử nghiệm đã có lớp bảo mật riêng.
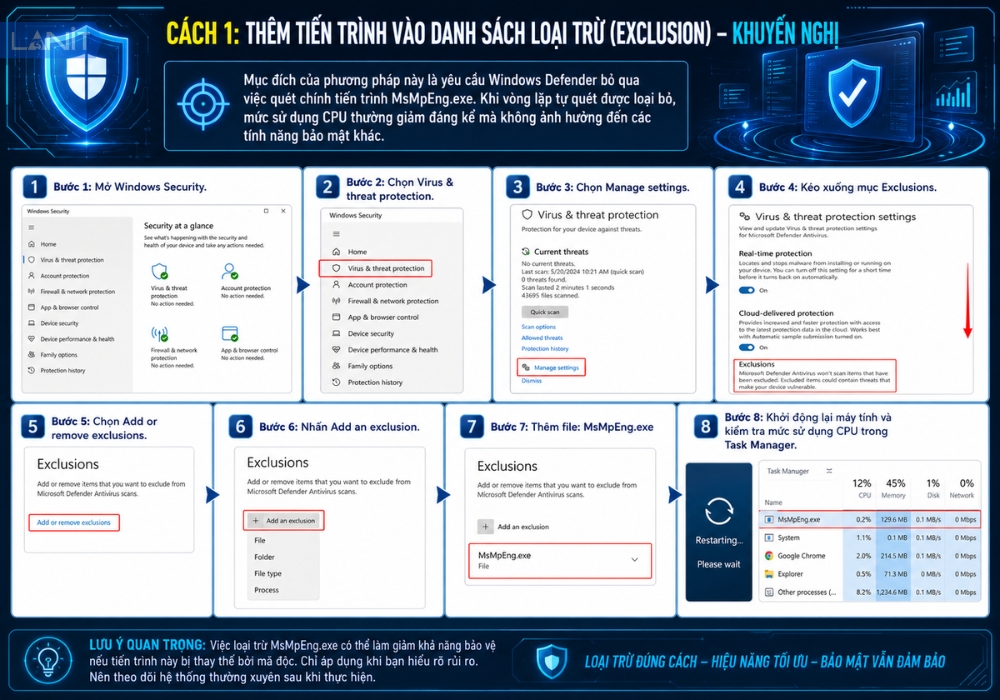
Cách 1: Thêm tiến trình vào danh sách loại trừ (Exclusion) – Khuyến nghị
Đây là phương pháp được nhiều chuyên gia khuyến nghị vì vừa giúp giảm tình trạng ngốn CPU vừa giữ nguyên khả năng bảo vệ của Windows Defender.
Mục đích của phương pháp này là yêu cầu Windows Defender bỏ qua việc quét chính tiến trình MsMpEng.exe. Khi vòng lặp tự quét được loại bỏ, mức sử dụng CPU thường giảm đáng kể mà không ảnh hưởng đến các tính năng bảo mật khác.
Các bước thực hiện:
- Bước 1: Mở Windows Security.
- Bước 2: Chọn Virus & threat protection.
- Bước 3: Chọn Manage settings.
- Bước 4: Kéo xuống mục Exclusions.
- Bước 5: Chọn Add or remove exclusions.
- Bước 6: Nhấn Add an exclusion.
- Bước 7: Thêm file: MsMpEng.exe
- Bước 8: Khởi động lại máy tính và kiểm tra mức sử dụng CPU trong Task Manager.
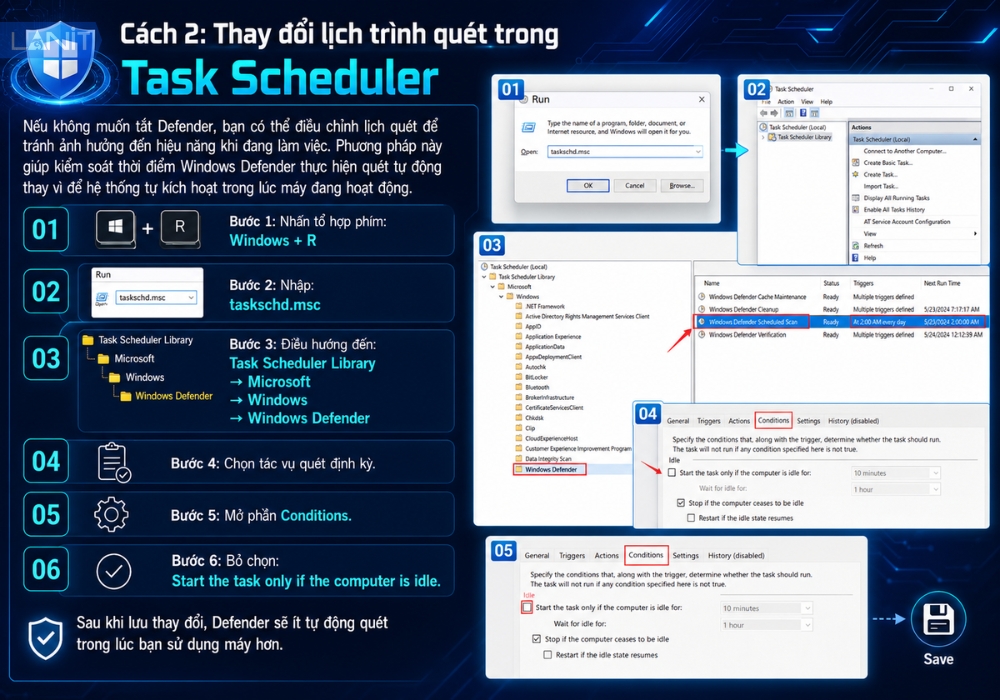
Cách 2: Thay đổi lịch trình quét trong Task Scheduler
Nếu không muốn tắt Defender, bạn có thể điều chỉnh lịch quét để tránh ảnh hưởng đến hiệu năng khi đang làm việc. Phương pháp này giúp kiểm soát thời điểm Windows Defender thực hiện quét tự động thay vì để hệ thống tự kích hoạt trong lúc máy đang hoạt động.
Các bước thực hiện:
- Bước 1: Nhấn tổ hợp phím:
Windows + R
- Bước 2: Nhập:
taskschd.msc
- Bước 3: Điều hướng đến:
Task Scheduler Library
→ Microsoft
→ Windows
→ Windows Defender
- Bước 4: Chọn tác vụ quét định kỳ.
- Bước 5: Mở phần Conditions.
- Bước 6: Bỏ chọn: Start the task only if the computer is idle
Sau khi lưu thay đổi, Defender sẽ ít tự động quét trong lúc bạn sử dụng máy hơn.
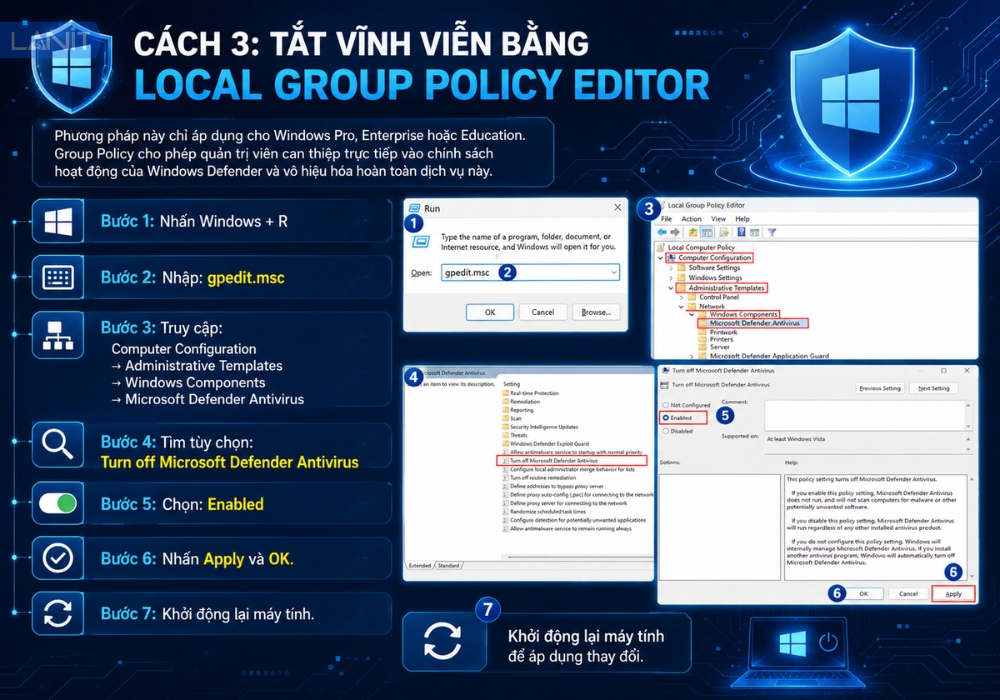
Cách 3: Tắt vĩnh viễn bằng Local Group Policy Editor
Phương pháp này chỉ áp dụng cho Windows Pro, Enterprise hoặc Education. Group Policy cho phép quản trị viên can thiệp trực tiếp vào chính sách hoạt động của Windows Defender và vô hiệu hóa hoàn toàn dịch vụ này.
Các bước thực hiện:
- Bước 1: Nhấn Windows + R
- Bước 2: Nhập: gpedit.msc
- Bước 3: Truy cập:
Computer Configuration
→ Administrative Templates
→ Windows Components
→ Microsoft Defender Antivirus
- Bước 4: Tìm tùy chọn: Turn off Microsoft Defender Antivirus
- Bước 5: Chọn: Enabled
- Bước 6: Nhấn Apply và OK.
- Bước 7: Khởi động lại máy tính.
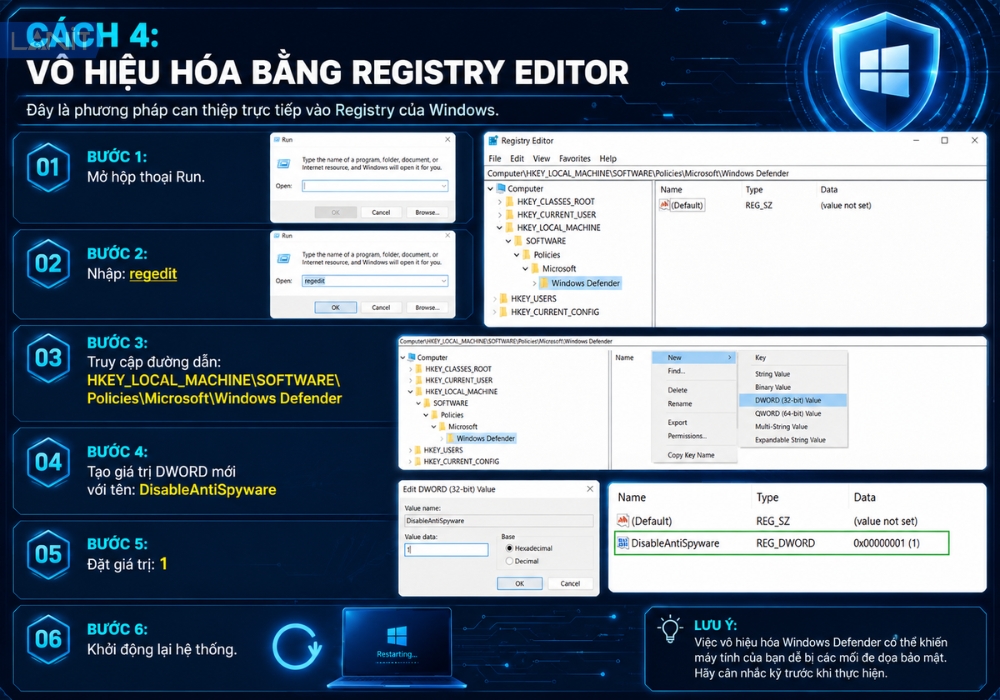
Cách 4: Vô hiệu hóa bằng Registry Editor
Đây là phương pháp can thiệp trực tiếp vào Registry của Windows.
Các bước thực hiện:
- Bước 1: Mở hộp thoại Run.
- Bước 2: Nhập: regedit
- Bước 3: Truy cập đường dẫn: HKEY_LOCAL_MACHINE\SOFTWARE\Policies\Microsoft\Windows Defender
- Bước 4: Tạo giá trị DWORD mới với tên: DisableAntiSpyware
- Bước 5: Đặt giá trị: 1
- Bước 6: Khởi động lại hệ thống.
Lưu ý: Trên các phiên bản Windows mới, Microsoft đã hạn chế hiệu lực của khóa DisableAntiSpyware. Vì vậy phương pháp này có thể không hoạt động trên mọi phiên bản Windows 11.
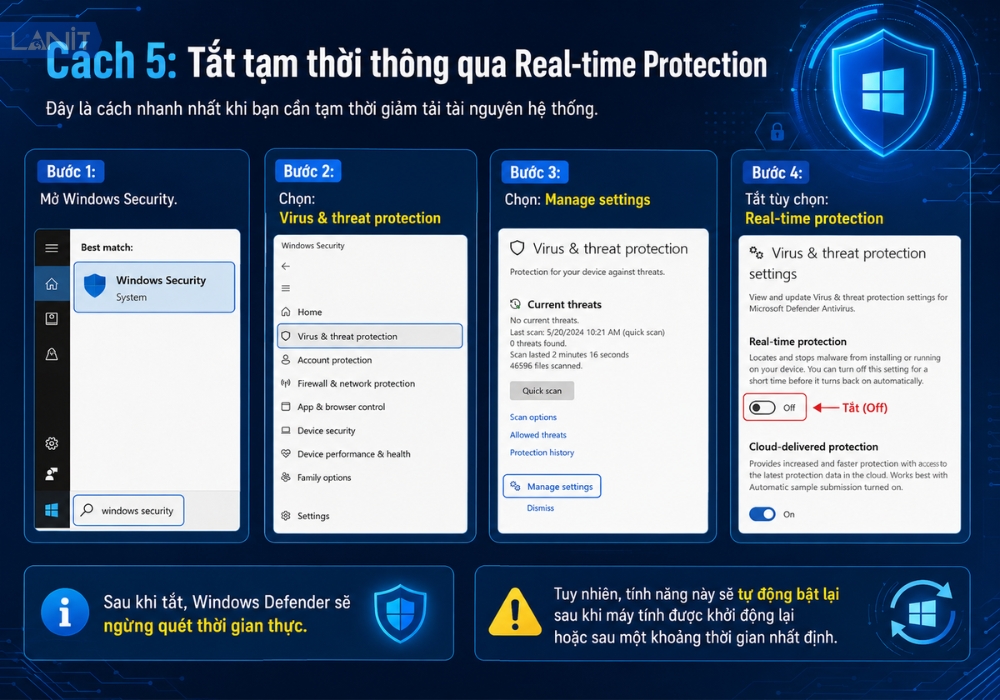
Cách 5: Tắt tạm thời thông qua Real-time Protection
Đây là cách nhanh nhất khi bạn cần tạm thời giảm tải tài nguyên hệ thống.
Các bước thực hiện:
- Bước 1: Mở Windows Security.
- Bước 2: Chọn: Virus & threat protection
- Bước 3: Chọn: Manage settings
- Bước 4: Tắt tùy chọn: Real-time protection
Sau khi tắt, Windows Defender sẽ ngừng quét thời gian thực.
Tuy nhiên, tính năng này sẽ tự động bật lại sau khi máy tính được khởi động lại hoặc sau một khoảng thời gian nhất định.
Ngoài việc xử lý tiến trình Antimalware Service Executable, nếu bạn đang vận hành các ứng dụng nặng hoặc cần duy trì các tác vụ 24/7, việc tối ưu tài nguyên phần cứng là yếu tố then chốt. Nếu máy tính cá nhân của bạn thường xuyên quá tải, bạn có thể cân nhắc các dịch vụ cho thuê máy chủ ảo chuyên nghiệp. Đây là cách giúp bạn tách biệt các tác vụ nặng ra khỏi máy tính cá nhân, đảm bảo hệ thống luôn vận hành ổn định, mượt mà và duy trì uptime cao mà không phải lo lắng về việc giật lag hay tiêu tốn tài nguyên hệ thống.